Touch and goes are a fundamental flight training maneuver. The pilot lands and then immediately takes off again. It might look like they’ve suddenly changed their mind, but, in actuality, a touch and go is a planned maneuver. In the cockpit, it’s pretty intense and rigorous. Some pilots even describe it as one of the most demanding maneuvers to pull off well.
So what is a touch and go landing, and why do pilots practice them so much?
What is a Touch and Go?
A touch and go is a funny name for a combination of maneuvers every pilot wants to master–takeoffs and landings. The idea of a touch and go landing is simple. You approach a runway, land, then add power and takeoff again. So you touch down, and then you go again.
Every student pilot learns touch and goes as part of training. It’s not a maneuver that happens outside of training–you don’t see airline captains doing touch and goes in their 777s. But in training, anything you can do to make things go faster is good.
Touch and goes are often confused with another maneuver–the go-around. A go-around is an aborted landing. In other words, for some reason, the pilot could not continue their landing approach, so full power was applied, and they initiated a climb to a safe altitude as quickly as possible.
Go-arounds are not planned maneuvers; they are initiated due to a vehicle on the runway or a bad landing approach that cannot be saved. Of course, go-arounds are occasionally practiced during training, but they differ from touch and go because they are not planned.
Touch and goes are one of five things a controller can clear a pilot to do on a runway. Pilots can be cleared for:
- Landing
- Touch and go
- Stop and go (a touch and go, but with a full stop on the runway before beginning the takeoff run)
- Low approach (fly over the runway but do not touchdown)
- “The option” (cleared to do any of the above)
Check out these 7 private pilot books to help you become a better pilot!
Why are Touch and Go Landings Important?
To understand why touch and goes are so important, consider the alternative.
If you want to practice numerous landings during one flight, a full-stop landing is the only other way to do it. You’ll make a normal arrival to the airport, coming to a stop on the taxiway after your landing. Then, instead of taxiing back to the ramp, you’ll taxi back to the runway for another departure.
So by doing the touch and go, you’re skipping the taxi back. Most students don’t need to practice taxiing down a taxiway–the tough stuff to learn is in the air. With the Hobbs meter running and the dollars flying out of your bank account, all that time could be better spent in the air. Taxiing back to the runway also opens up the possibility of other delays, especially at busy airports.
None of this is to say that touch and goes are always appropriate. There are many times when they are not the right answer on a training flight. For example, you might need a mental break, or your flight instructor might need to discuss the maneuver with you. A full-stop taxi back will give you a moment to consider things while not worrying about flying the plane.
Touch and go landings are also an excellent tool for learning the legs of the traffic pattern. Aircraft pitch and power control are critical to hold your altitude and quickly transition from climb to straight and level, and then into the landing descent. All of this is done while correcting for wind drift, watching for traffic, and following air traffic control’s instructions.
How to Fly a Touch and Go
When you break down each phase, a touch and go is an intense maneuver with many different phases. This is because you combine all of the critical phases of flight into one quick and rapid set of tasks. Here’s what a touch and go procedure might look like:
Step 1 – Takeoff
The maneuver starts with a normal takeoff, with the plan to remain in the traffic pattern. After your departure checks and briefing are complete, you’ll get clearance, visually clear the runway and approach for traffic, and then roll onto the runway. Takeoff power is applied, and a Vy climb is initiated.
Step 2 – Departure
Unlike when departing the area, you’ll remain in the traffic pattern. Maintain a Vy climb until traffic pattern altitude (TPA)–usually 1,000 feet AGL.
Step 3 – Traffic Pattern
At traffic pattern altitude (TPA) minus 300 feet, you’ll turn into to crosswind leg. Upon reaching TPA, you’ll level off the plane and reduce power to a low-cruise setting.
Turn into the downwind leg parallel to the runway at the appropriate distance. There’s no set distance from the runway that this leg should be flown since larger and faster planes will want to fly wider patterns. Small trainers are usually kept between a quarter to a half-mile from the runway. Never stray so far from the runway that you are beyond glide distance from it.
As you fly the downwind leg, you’ll want to pay close attention to the other traffic in the vicinity. Is anyone else coming in to land? Exactly how this works will depend on whether you’re at a controlled field or an uncontrolled field. Either way, you need to know if the runway is yours or you’ll be following someone.
Abeam the numbers on the runway, begin setting up your landing. First, complete the landing checklist, then reduce power considerably–usually to around 1,500 RPM. Let the plane slow and settle into a decent. As soon as you are below Vfe, extend the first notch of flaps.
Turn your base leg close enough that you can glide to the runway should the engine fail. If you are following another plane, maintain your altitude longer and don’t turn base until the other plane has passed you on their final approach.
Once on the base leg, continue slowing by adding another notch of flaps.
Turn final so that you’re aligned with the runway. Ensure you do not over or undershoot on the turn. If you do, keep the plane coordinated and always keep your traffic pattern turns to less than 30 degrees of bank. The traffic pattern is no place to practice steep turns.
Once established on final, add the final notch of flaps and slow to your plane’s Vref speed. Reference the VASI or PAPI to fine-tune your descent angle. Use your pitch to control your airspeed to maintain Vref and your power to control your descent rate.
Step 4 – Landing
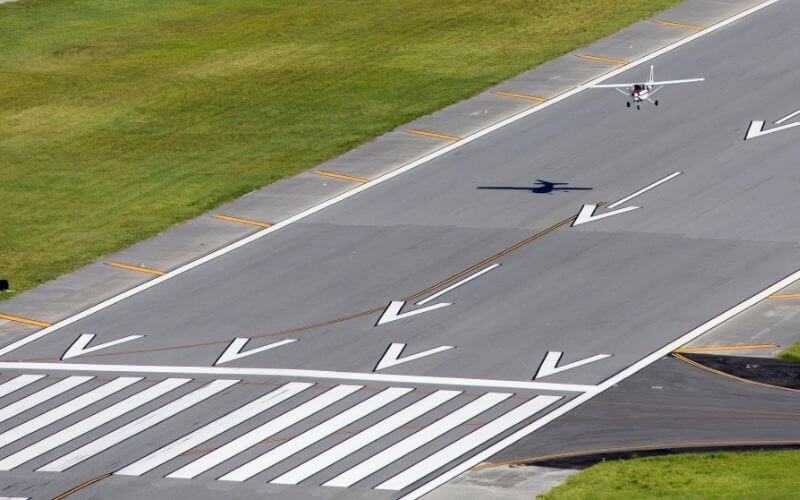
Maintain a stabilized approach until you are over your aim point on the runway. There, begin slowly reducing the power to idle. Manage the plane’s momentum by slowly pitching up as the airspeed bleeds off.
The goal of every landing should be to settle onto the main wheels with a nose-high attitude, touching down at an airspeed just above a stall.
(if you need help understanding airspeed take a look at my post on indicated airspeed vs true airspeed).
Step 5 – Takeoff Again
After touchdown, let the plane lose speed as you roll down the runway. Put the nose wheel on the centerline. Once the plane’s momentum has settled, raise the flaps and smoothly apply full power. Transition into a takeoff, rotate off at Vr, and climb at Vy.
Start the pattern again, and repeat as necessary!
Common Mistakes Made During Touch and Goes
Touch and goes are an advanced maneuver–you can’t start mastering a touch and go maneuver until all of the other bits and pieces have been learned. And with so much going on in such a short space and time, there are many things to practice.
In the end, that’s what touch and goes help a pilot do–they are done for practice. They compress everything together into one quick maneuver so that you can practice all of the tasks you need over and over again relatively quickly. The point isn’t to rush through them; it’s just to get in lots of practice. In other words, touch and goes are a trip to the batting cage for pilots.
All of the errors you might make during takeoff, departure, or traffic patterns could happen to you during a touch and go. Common problems are things like rushing the process, skipping checklists, failure to maintain stabilized approaches, and keeping positive aircraft control after touchdown.
Raising the Flaps Too Soon – Or Worse
Everything in the cockpit of an airplane should be done carefully and never in haste. This is especially true on touch and goes when hitting the wrong button could result in a very unpleasant experience. Indeed, it’s too common for pilots to raise the landing gear instead of the flaps while rolling down the runway and transitioning for takeoff.
This incident is common enough that some flight schools prohibit touch and goes in their complex planes.
Carrying Too Much Momentum After Touchdown
This error does not result during a touch and go, but it is related.
Airplanes are not extremely stable while on the ground–they can tip over readily and lose directional control easily. When the plane has an excess of momentum, such as after it has just touched down, there is a critical time where the plane’s weight is still carried by her wings and not her wheels.
The pilot must realize that the plane is still flying and is not ready to be turned or taxied. This is one reason why touch and go flying is often practiced later in training, after students have a solid feeling for what a normal approach, touch down, landing roll, and turn off onto the taxiway feel like.
If you’ve been practicing touch and goes for a while, you’ll become accustomed to the plane rolling down the runway quickly. However, it’s essential to separate an airplane touch and go from a normal landing. You should fly the plane to a stop during a normal landing–or very nearly to a stop. Then, once the plane is supported only by her landing gear, a slow and careful turn off onto the taxiway can be completed.
According to the FAA, here are the most common errors during approaches and landings.
- Failure to complete the landing checklist
- Inadequate wind drift correction
- Overshooting or undershooting turns and using too steep of banks to correct
- Failure to remain coordinated (incorrect rudder usage)
- Unstable approaches
- Failure to control pitch and power to compensate for flap settings
- Poor trim technique
- Trying to maintain altitude using pitch only (incorrect use of power)
- Rounding out too high or too low
- Touch down in the wrong attitude (usually too nose-low)
- Failure to hold enough back pressure to keep the nose up after touch down
- Excessive braking
- Loss of aircraft control during touchdown and rollout
For complete details of how to fly takeoffs, landings, and flying the airport traffic pattern, check out the FAA’s Airplane Flying Handbook.