In this article we’re going to cover flying basics; how airplanes fly and the basic parts of an airplane.
They say that the flying is the easy part.
Once you start diving into your pilot books and studying aerodynamics, you’ll quickly realize what they mean. But there’s good news: flight instructors have been doing this for a long time and have several tricks up their sleeves.
One of those tricks is the building blocks method of teaching.
Put simply, it means that you don’t need to learn everything all at once. Instead, start by learning a few foundational pieces of information about the plane and flying, and then slowly build your structure of deeper knowledge on top of that foundation. This is stuff you’ll cover during what I like to call, basic flight training.
To that end, here is an introductory look at some of those foundational pieces–a collection of terms you’ll learn much more about during flight training.
But to start, here are some quick definitions and explanations of the basic parts of an airplane, forces of flight, and pilot flight controls to give you the very basics of flight.
Basic Parts of an Airplane
To start things off in our flying basics guide let’s talk about parts of the airplane. One of the first steps in learning to fly and work around airplanes, in general, is to knock out some vocabulary.
Fuselage
The main body of the plane is called the fuselage. This is where the cockpit, passenger cabin, and luggage compartment are. On a single-engine airplane, the engine is usually mounted to the front of the fuselage. The wings and other components are also attached to it.
Wings
The wings generate lift, so they’re pretty important. The wings also contain the aircraft’s fuel tanks. There are also a few flight controls–ailerons and flaps–mounted to their trailing edges. On multi-engine airplanes, the engines are mounted to the wing on attachments called nacelles.
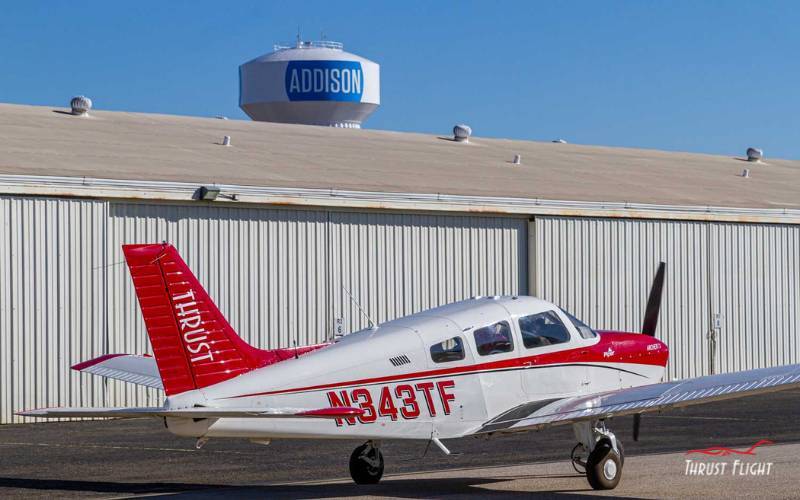
Small aircraft are roughly divided into high-wing and low-wing models. High wings, like Cessnas, have their wings mounted to the upper fuselage above the passenger’s heads. On the other hand, low wings like Pipers have the wing-mounted below you. Beyond aesthetics, there’s not as much difference between the two as you might think.
When you learn more about aerodynamics, you’ll learn more about the different shapes of wings and their unique advantages and disadvantages.
Empennage
Most people refer to the empennage as the “tail” of the airplane. It has vertical and horizontal stabilizers that look like the feathers on an arrow. And, in the most basic sense, they do the same job as arrow feathers, keeping the aircraft pointed straight ahead.
The trailing edge of those stabilizers each has a moveable flight control surface. On the trailing edge of the horizontal stabilizer, there is an elevator. On the vertical stabilizer, there is a rudder.
Landing Gear
“Landing gear” is the pilot name for the wheels–but there’s more to it than that. The landing gear provides maneuverability on the ground, braking, and, most importantly, is designed to absorb impacts from less-than-perfect touchdowns. So the term landing gear encompasses the wheels, struts, steering mechanisms, and brake system.
Landing gear might be fixed or retractable. Retractable gear reduces drag when flying at speed but is complicated and expensive. Streamlined fairings often cover fixed gear to reduce drag.
Powerplant
The powerplant is part of the airplane that provides thrust. On most small planes, this is a reciprocating gasoline engine connected to a propeller. Larger aircraft may have turboprop engines with propellers or turbofan engines like airliners and corporate aircraft.
Four Forces of Flight
When you do crack open a book to learn the basics of flight one of the first things you’ll go over is the four forces of flight.
There’s much to learn about aerodynamics and what it takes to get an airplane off the ground. But the first step is to master the four forces of flight: lift, weight, thrust, and drag.
Everything you need to know will come back to these four basics of flying a plane.
Lift
Lift is generated by the wings when air flows over them. It pulls the aircraft up and away from the earth, acting opposite weight. If the plane is not climbing or descending, lift is equal to the force of weight.
A pilot must be able to control the amount of lift that the wings make. There are three ways to make more lift from the wings–each of which you’ll learn more about going forward. One way is to simply fly faster–the more air that passes over the wing, the more lift is made. Another way is to raise the nose, which pilots call increasing the angle of attack. Finally, in some cases, the wing shape can be changed to make more lift. This is how flaps work. They’re used to enable an airplane to make more lift at slower airspeeds–handy when you’re coming in to land.
Weight
Weight is the force that pulls the aircraft downward, often thought of as gravity. The aircraft’s weight is affected by how much load it carries–and it has limits. Therefore, you must ensure the aircraft is not overloaded before every flight by calculating your actual takeoff weight.
The force of weight acting on a plane is not constant. Sometimes, other forces are added to it so that the actual load on the plane is greater than just the calculated weight. Load factor measures how much the load increases in a given maneuver. Turns are the most common maneuver that increases load factor–in a 60-degree bank turn, the plane will feel twice as heavy as it does in straight and level flight. That means it needs to make twice as much lift as it does in straight and level flight.
Thrust
Thrust is the forward motion created by the powerplant. Adding power increases thrust, and reducing power takes it away.
Drag
Thrust is used to counter drag. Drag is an aerodynamic force that holds the airplane back and resists forward motion. It comes from two places.
Parasite drag comes from air flowing over the airplane. Some planes have more drag than others, but some is inevitable. The faster you go, the more air flows over the airplane, and the more drag is produced. For example, if you double your airspeed, the plane makes four times as much drag.
Induced drag is made by the wings when they make lift. It’s not possible to make lift without it, but it is worst at slow airspeeds.
So, when the plane goes very slowly, it makes a lot of induced drag. When it is going fast, it is making a lot of parasite drag. Both situations require more power from the engine to maintain a constant airspeed. If drag increases, but thrust does not, the aircraft will slow down.
There’s much more to say about lift, weight, thrust, and drag, but these descriptions provide a starting point for your studies.
Airplane Controls
One of the most critical components for new pilots learning flying basics is how to control the airplane.
The pilot’s controls in the cockpit are connected to flight control surfaces on the wings and empennage. In the case of training airplanes, they’re connected via simple mechanisms of pulleys and cables. When the pilot turns or pushes/pulls the controls, the cables make a part of the wing or tail deflect air in one way or another, causing the aircraft to move in a specific direction during flight.
The basics of flying a plane are one of the first things you’ll learn in flight training.
Primary Flight Controls
Primary controls are necessary for flight–they maneuver the plane around one of the three main movements a pilot needs. They are:
Nose up and down–Pitch
One wing up, the other down–Roll
Nose left and right–Yaw
Elevator
The airplane elevator controls pitch. The elevator is mounted on the back of the empennage. The elevator moves up and down when the pilot moves the control yoke or stick forward or back (“Pull up!”).
Ailerons
The ailerons control roll. There are two–one on each wing–, and they are linked together. When one aileron goes up, the other goes down. The pilot controls roll by turning the yoke or stick left or right.
Rudder
The rudder controls yaw, which moves the nose of the airplane left or right. The rudder is mounted on the trailing edge of the vertical stabilizer. Foot pedals control it–push the left pedal, and the rudder deflects to the left.
Secondary Flight Controls
A secondary flight control isn’t critical for flight, but it helps the pilot control the plane in some way. The more complicated an aircraft, the more secondary flight controls it might have. Most training planes only have two: flaps and trim tabs.
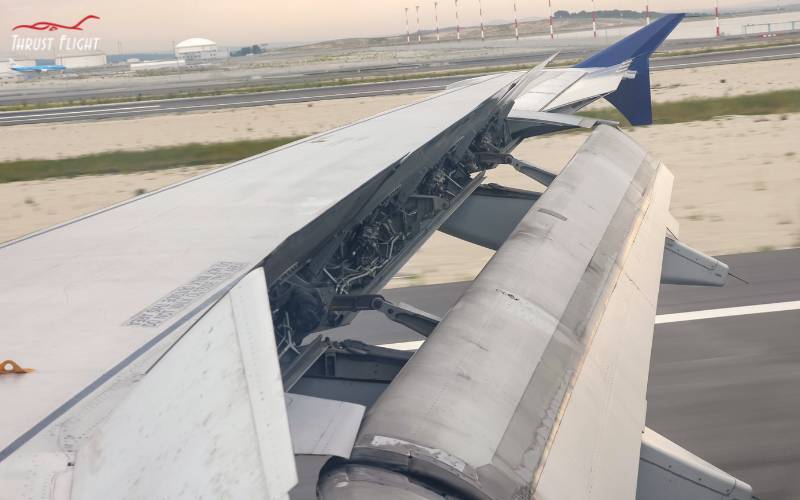
Flaps
Flaps are mounted on the inboard section of the back of the wings. They extend down together in increments. As they go down, they change the shape of the wing slightly so that it might make more lift at lower airspeeds. But, of course, they also make more drag as they do it.
There are several different designs of flaps, so they don’t all look or work the same way. Large aircraft sometimes even have leading-edge flaps on the forward side of the wing.
Flaps are controlled by a small lever in the cockpit. Most planes have an electric motorized system that extends the flaps when the switch is moved. A few planes, like the Piper Archer, have manual flaps extended with a parking brake-looking lever between the pilot seats.
Trim
Trim systems are designed to make flying easier for the pilot. Since the amount of pitch necessary to maintain and climb, descent, or straight-and-level flight always changes due to thrust, speed, loading, and atmospheric conditions, the trim allows the pilot to neutralize the control force.
That way, they don’t get a tired arm from pressing or pulling on the controls all the time.
It works by moving a small tab on the elevator’s trailing edge. When the tab is moved, the elevator forces change so that the pilot does not have to do it manually with their arms. The trim is changed using a wheel in the cockpit, usually mounted near the pilot’s hand.
Some planes also have electric trim systems activated with a thumb switch on the yoke or stick.
More about flying basics can be found in the FAA’s Pilot’s Handbook of Aeronautical Knowledge, Chapters 4 and 6.
Just getting started on your aviation journey and wondering what can you do with a private pilot license?
How to Fly an Airplane
So, know that you’ve learned about the basic parts of an airplane, the four forces of flight, and the airplane controls, let’s learn to fly a plane.
Pre-flight Procedures
Pre-flight procedures are your first step. Pilots must complete a thorough preflight before takeoff.
These procedures ensure the aircraft is safe and ready for flight. They involve inspections and system checks.
Inspection and Safety Checks
Start your pre-flight routine by checking the airplane’s exterior. Walk around the aircraft, looking for any visible damage or issues. Check the wings, tail, and fuselage for dents or cracks.
Inspect the landing gear and tires. Make sure they’re in good condition and properly inflated. Look for any fluid leaks under the plane.
Next, check the fuel tanks. Drain a small amount of fuel from each tank to check for water or debris. Make sure you have enough fuel for your planned flight plus reserves.
Examine the propeller or jet engines for any damage. Check that all covers and caps are correct.
Aircraft Systems and Instruments
Enter the cockpit and begin your interior checks. Start by reviewing the aircraft’s technical log. This document lists any known issues or recent maintenance.
Check all flight controls. Move the yoke, rudder pedals, and throttle to ensure they move freely. Verify that all switches and circuit breakers are in the correct positions.
Test the radio and navigation equipment. Make sure you can communicate with air traffic control and that your GPS is working properly.
Review your instruments. Check that they’re reading correctly and that there are no warning lights. Pay special attention to the altimeter setting.
Finally, go through your emergency checklists. Know where all safety equipment is located in case you need it during the flight.
Fundamentals of Flight Operations
Flying a plane involves key operations that pilots must master. These include taking off, navigating, and communicating with air traffic control. Let’s explore each of these crucial aspects.
Takeoff and Initial Climb
As mentioned, before takeoff, you’ll need to complete pre-flight checks then taxi to the runway as directed by ATC. Once cleared, apply full throttle and steer down the runway. As you reach takeoff speed, gently pull back on the yoke to lift the nose.
The plane will start to climb. Keep a steady pitch angle and maintain a positive rate of climb. Watch your airspeed and adjust as needed.
During the initial climb, focus on these key points:
- Maintain proper pitch attitude
- Monitor airspeed
- Retract landing gear when positive rate of climb is established
- Follow noise abatement procedures if required
Remember to transition smoothly from climb to level flight once you reach your desired altitude.
Navigating Through the Sky
In the air, you’ll use various tools to navigate. Your main flight instruments include:
- Altimeter
- Airspeed indicator
- Attitude indicator
- Heading indicator
- Turn coordinator
These help you maintain straight and level flight, execute turns, and manage climbs and descents.
To turn, use a combination of aileron and rudder inputs. This creates a coordinated turn, balancing roll and yaw. For climbing, increase pitch and power. For descending, reduce power and lower the nose.
Always be aware of your position relative to the ground and other aircraft. Use visual references and navigation aids to stay on course.
Communication with Air Traffic Control
Clear communication with Air Traffic Control (ATC) is vital for safe flight. You’ll use a radio to talk to controllers on the ground and in the air.
Key points for effective communication:
- Use proper radio etiquette
- Speak clearly and concisely
- Read back important instructions
- Report your position when required
ATC will give you instructions for takeoff, landing, and navigating airspace. They’ll also provide weather updates and traffic advisories.
Always listen carefully to ATC instructions. If you’re unsure, don’t hesitate to ask for clarification. Good communication helps keep the skies safe for everyone.
Mastering Takeoffs and Landings
Takeoffs and landings are key skills for pilots to master.
They require precision, practice, and attention to detail. Proper technique ensures safety and smoothness during these critical flight phases.
Takeoff Techniques and Best Practices
To start your takeoff, align the plane with the runway centerline. Apply full throttle smoothly and use the rudder to stay straight. As you gain speed, gently pull back on the yoke to lift the nose wheel.
Keep the wings level and climb at the right speed. Don’t rush to retract the landing gear. Wait until you’re at a safe altitude and airspeed.
Watch for crosswinds. They can push you off course during takeoff. Use aileron into the wind and opposite rudder to stay straight.
Takeoff checklist:
- Flaps set correctly
- Instruments checked
- Runway clear
- Full throttle applied smoothly
Approach and Landing Procedures
As you approach the runway, maintain the right speed and descent rate. Use flaps to slow down and increase lift. Keep your eyes on the runway’s aim point.
At about 10-20 feet above the runway, start to flare. Pull back gently on the yoke to level off. This slows the plane and raises the nose.
Touch down on the main wheels first. Let the nose wheel settle gently. Use brakes smoothly to slow down. Don’t jam them on – this can cause skidding.
In crosswinds, use the “crab” method. Point the nose into the wind slightly. Just before touchdown, use rudder to align with the runway.
Advanced Maneuvers and Navigation
We’ve covered the very basics of flying, but flying a plane involves mastering many complex techniques and understanding different flight conditions. These skills are crucial for safe and efficient air travel.
VFR and IFR Flight Conditions
Visual Flight Rules (VFR) apply when visibility is good. You fly by looking outside and using visual cues. In VFR, you need to stay clear of clouds and maintain visual contact with the ground.
Instrument Flight Rules (IFR) are used in poor visibility. You rely on your plane’s instruments to navigate. IFR conditions require special training and certification (instrument rating).
Flight patterns are important in both VFR and IFR. The traffic pattern is a standard path planes follow near airports. It helps organize air traffic and ensure safe landings and takeoffs.
Advanced maneuvers like aileron rolls and loops require skill and practice. These moves test your control of the plane’s attitude and energy.
Emergency Procedures
Knowing emergency procedures is vital for every pilot. You must be prepared to handle unexpected situations quickly and calmly.
There are many emergencies you’ll need to be prepared for. And we couldn’t possibly cover them all here. But here are a few important emergencies to understand:
- Engine failure is a serious emergency. Your first steps are to maintain control, find a safe landing spot, and try to restart the engine.
- Fire in flight is another critical situation. You need to shut off fuel, use extinguishers if available, and land as soon as possible.
- In case of instrument failure, you must rely on backup systems or visual cues. It’s crucial to practice flying with limited instruments.
Remember, regular training in emergency procedures can save lives. Always review your plane’s emergency checklist before each flight.
Understanding Basic Aircraft Instruments
The six main flight instruments form the “six-pack”. These include:
- Airspeed indicator: Shows how fast you’re flying
- Artificial horizon: Displays the plane’s position relative to the ground
- Altimeter: Measures your height above sea level
- Vertical speed indicator: Shows rate of climb or descent
- Heading indicator: Points to your direction
- Turn coordinator: Indicates the rate of turn
These tools give you key data about your flight path and plane’s attitude. The artificial horizon is vital. It helps you keep the wings level and maintain the right pitch, even in low visibility.
Advanced Avionics and Navigation Systems
Modern planes have glass cockpits with digital displays. These show flight info on screens instead of dials.
Key features include:
- GPS navigation
- Traffic collision avoidance systems
- Weather radar
- Autopilot
These systems make flying easier and safer. They help you plan routes, avoid bad weather, and stay clear of other aircraft.
Glass cockpits often have a primary flight display (PFD) and a multi-function display (MFD). The PFD shows basic flight info. The MFD can show maps, weather, and system status.
You’ll need special training to use these advanced systems. But they can greatly improve your situational awareness and flight safety.